Role guide
Run the placement plan for your programme
If your organisation calls this role TPD, this is the guide to use for trainee planning, validation, reporting, ARCP history, and operational exports.
What this role covers
Training programme directors work inside assigned programmes and use the main operational tools to keep the plan accurate.
- Plan placements in
Capacity Gridusing drag-and-drop. - Maintain trainee records in
Trainee List. - Edit placements, ARCP history, and trainee profiles in the trainee record.
- Review real-time validation warnings.
- Analyse fill rates and gaps in
Reports & Gaps, and export the workbook. - Configure hospital sites and capacity in
Manage Sites. - Test structural changes safely using the scenario planner.
I want to…
Jump straight to the task.
Before you start
The same account can hold access to more than one programme, so context checking is part of normal practice.
- Confirm the selected organisation and programme in the header.
- If the programme is new, confirm
Programme Setuphas already been initialized. - If records look missing, check programme context before assuming deletion.
- On first login the app runs an onboarding tour. Re-run it any time from the
?help menu in the header.
Set up a new programme
You can open Programme Setup for your assigned programmes, both to initialize a new programme and to adjust the local configuration that drives planning.
- Confirm the correct programme is selected in the header.
- Open
Programme Setup. - If the programme is new, choose a starter blueprint and initialize the local template.
- Review the local stages, validation rules, and capacity mappings.
- Save the updated configuration before you return to operational planning.
Plan on the capacity grid
Capacity Grid is the main planning surface. It shows placements by site and time period, grouped by region.
- Filter by grade, region, stage, or fuzzy text search, which matches on trainee name, GMC number, or site name.
- Drag a placement to a new site or start month.
- Select a placement to open that trainee's record.
Working in the capacity grid covers the rest of the controls in detail: zoom, the visible range, compact view, the heatmap, moving a placement by keyboard, and printing.
Move a trainee to a different site or month
There are two ways, and they differ in what happens to the trainee's other placements.
On the grid — moves one placement only.
- Open
Capacity Grid. - Filter the view if you need to focus on a region, stage, or trainee.
- Drag the placement to a new site row or start month, and drop it.
- The trainee's other placements do not move. If the drag opens a gap or makes an overlap, the grid marks it — fix it with
Resolve(see Fix an overlap, a gap or an over-capacity site).
In the trainee record — can move the later placements too.
- Open the trainee record and select the pencil (
Edit block) on the placement's row. - Change the site,
Start MonthorDuration (Months). - If the change moves the dates, the form asks
This change moves the dates. What happens to the later posts?Pick one of the choices below. Each says what it will do before you pick it. - Save. You must pick a choice first; nothing is chosen for you.
Move later posts— the later placements move by the same amount.Do not move— only this placement changes. The form says if that leaves a gap or makes an overlap.Move all posts, ended posts too— shows only when later placements that have already ended (before today) would otherwise stay put. "Ended" means before today, not before the placement you edit.
- Both ways show a confirmation message with
Undo. - In
Testingmode the change goes into the scenario, not the live plan.
Find a trainee and open their record
Trainee List is the best place to find a person quickly and then open the full trainee record. Each trainee record holds the profile, full placement history, ARCP events, and audit log. Placeholder trainees appear with a TBC badge and italic grey name to distinguish pre-recruited slots from confirmed trainees.
- Open
Trainee List. - Search by name, GMC number, or current training grade; filter by status.
- Add a trainee, edit a trainee, or soft delete a trainee if your access permits it.
- Open the trainee record for detailed work on placements, ARCP, or profile.
- Each trainee record stores: name, status, baseline WTE, GMC number, email, phone, training start date, CCT date, placeholder flag, and admin notes.
- The displayed current grade comes from the placement covering today, or the latest finished graded placement. Future placements alone do not supply a current grade. Set grades on placements rather than on the trainee profile.
- Use
Look up GMCnext to the GMC number field to look up the trainee's name from the GMC register. The button is enabled when a seven-digit number is entered. - Mark a trainee as a placeholder when the slot is pre-recruited but no person has been confirmed yet.
- Status options are: Active, Inactive, Left Programme, and CCT Complete.
- If a trainee's GMC number matches another programme, a cross-programme indicator appears on the record. This is used for duplicate detection.
- The trainee record opens on the new pathway view: a strip showing the whole pathway to scale with a Today marker, and the placement list grouped by stage below it. If you prefer the previous layout, select
Use classic viewat the bottom of the record; the choice is remembered on this browser only, andTry the new pathway viewswitches back.
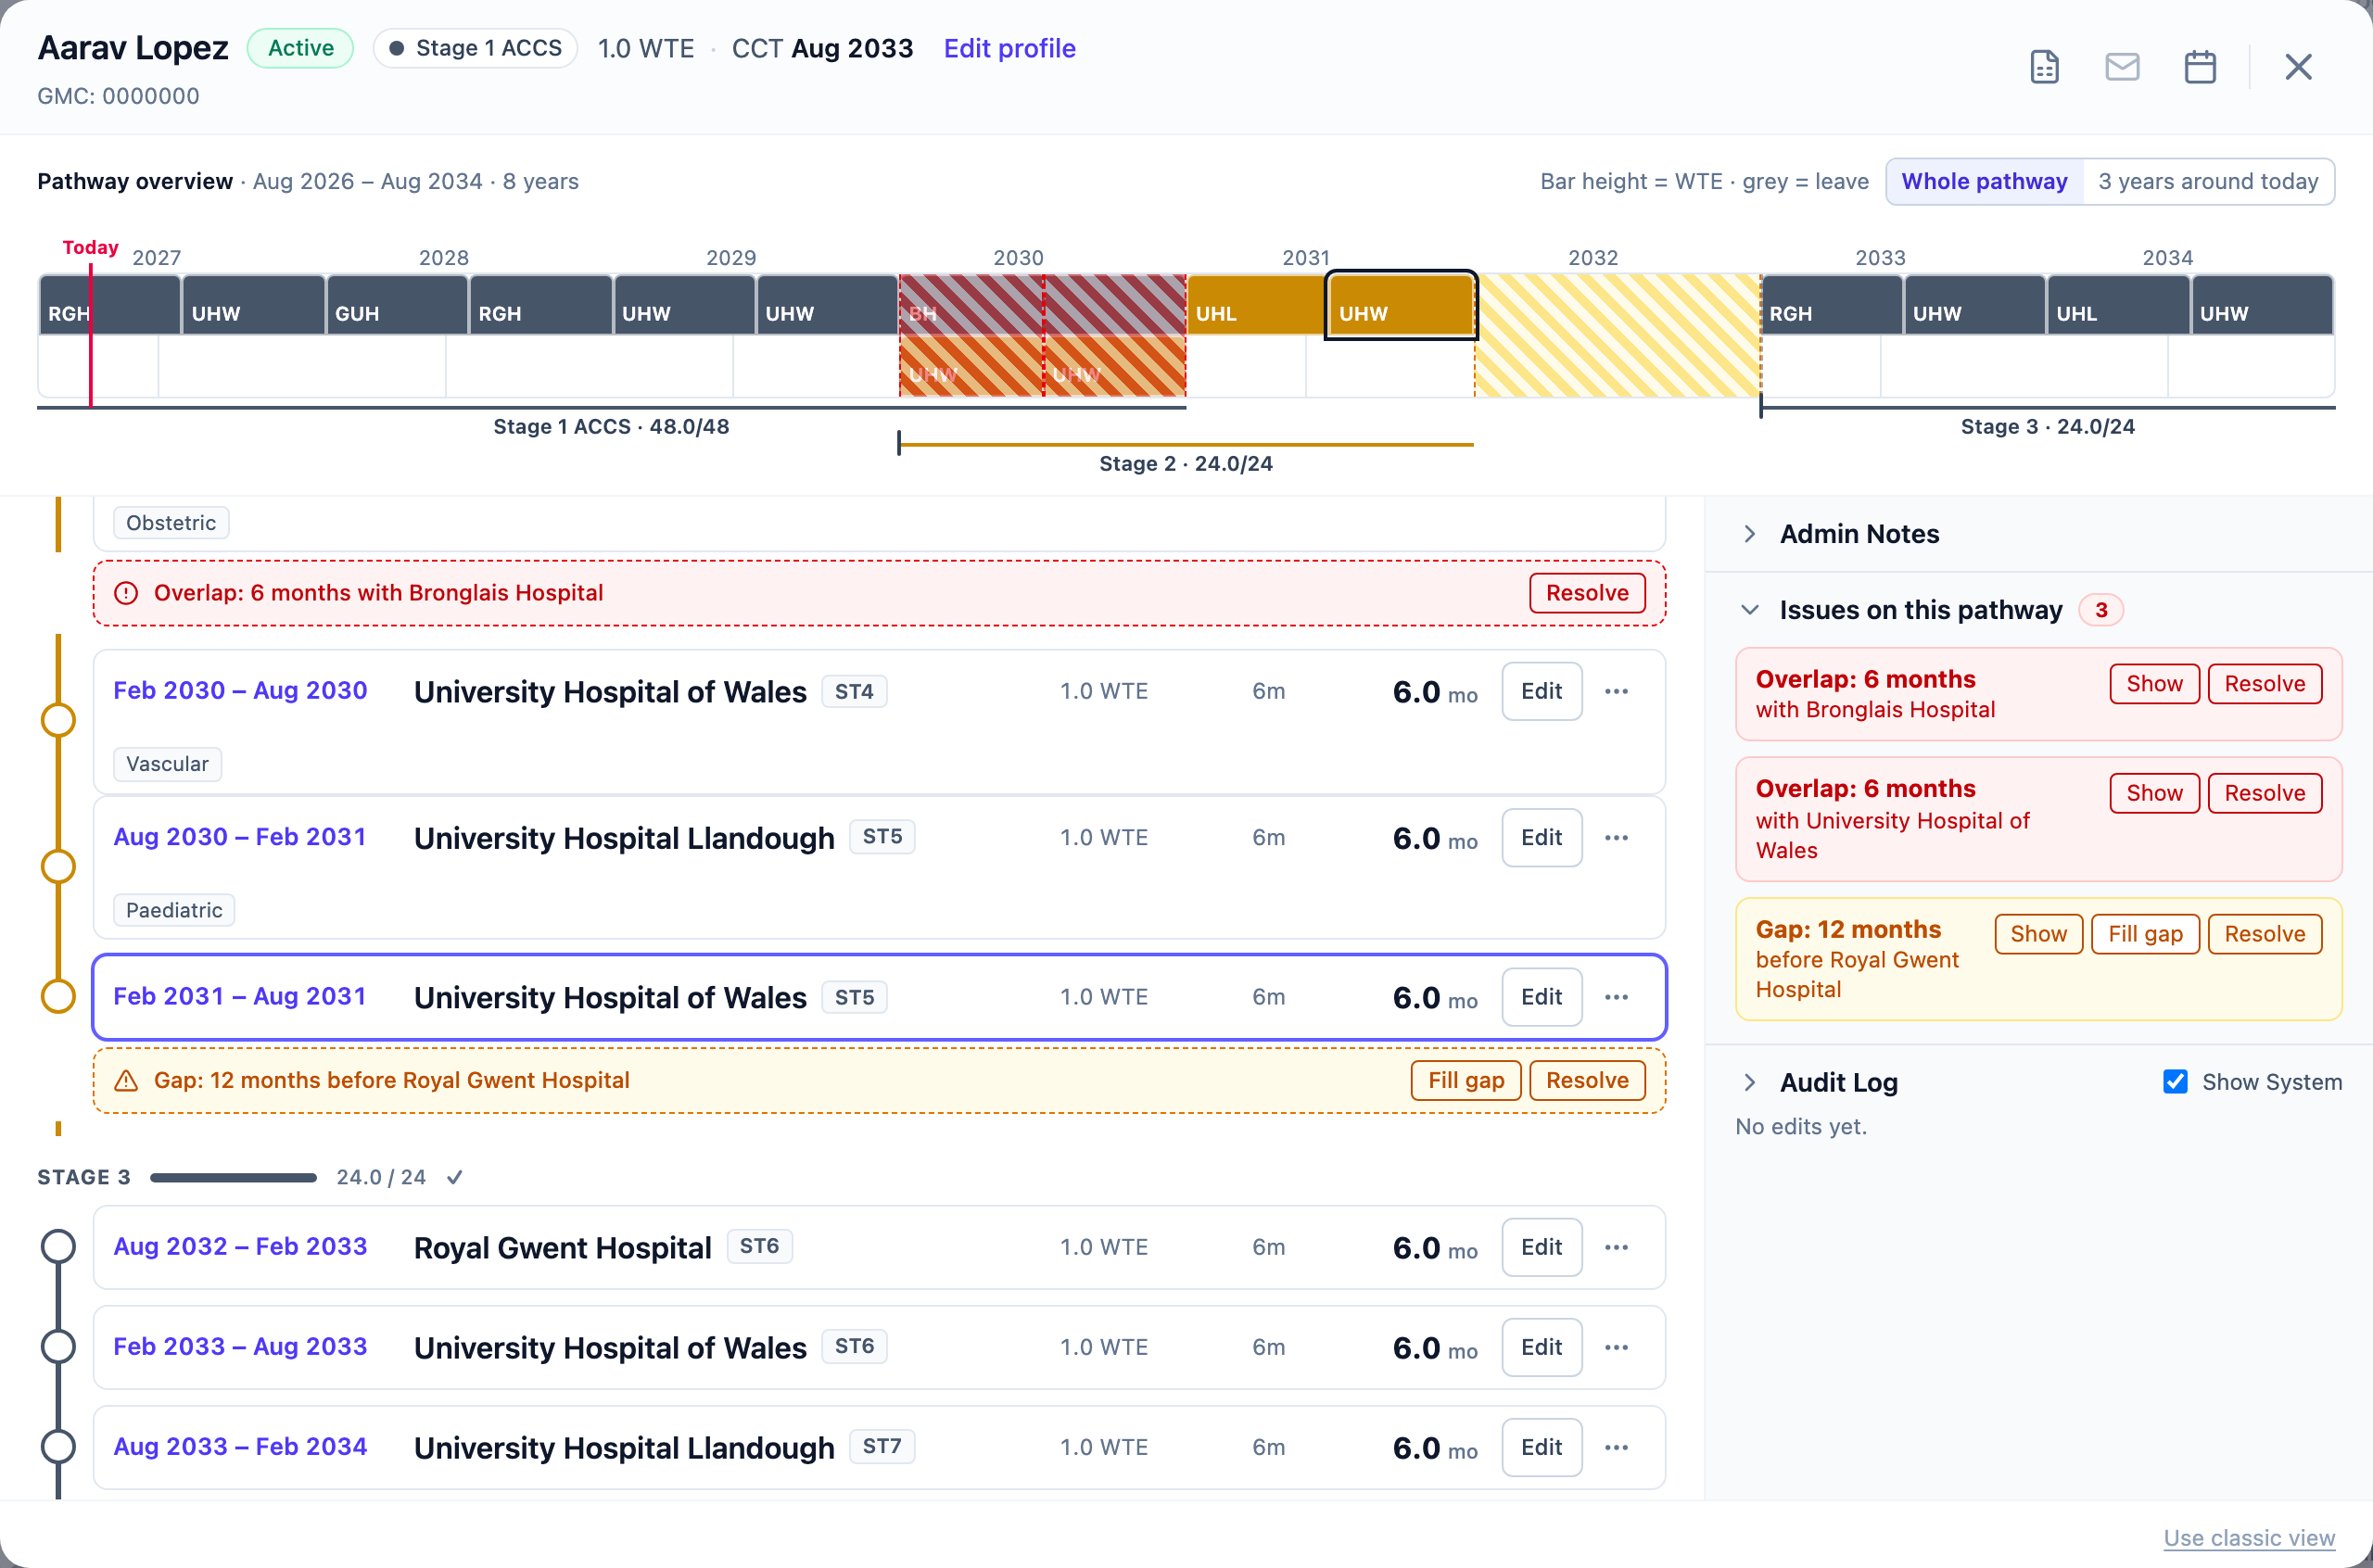
Issues on this pathway.Edit a trainee profile
The trainee record combines profile editing, placement editing, ARCP history, admin notes, and audit history in one place. Profile fields you can update include:
- name
- status
- baseline WTE
- contact details
- GMC number, with
Look up GMCto look up the name from the GMC register - training start date and CCT date
- placeholder trainee flag, marking a pre-recruited slot with no confirmed person
- admin notes
On the new pathway view, select Edit profile in the record header to reach these fields. The header also shows the current stage, the CCT date (or the date the pathway ends, if none is set), and equivalent months done against expected.
Add or reshape a placement
Placement editing happens inside the trainee record. This is the most controlled way to insert or reshape a sequence of placements. You can also drag existing placements directly on the capacity grid for faster moves.
On the new pathway view, placements are grouped by stage, one row per placement. Hover between two rows for an insert line, or use the ⋯ menu on a row for Insert after or Delete. Select + Add next post to add one at the end, after the latest end date. Switch Every rotation to Grouped to merge back-to-back posts at the same site, with the same stage, WTE and leave flag, into one row with an Edit all N action. The Today line sits after the last post that starts on or before today.
- Open the trainee record.
- Choose where to add or edit a placement in the placement list.
- Set the site, start month, and duration in months.
- Optionally set a WTE for this placement if it differs from the trainee's baseline.
- Set the training grade for this placement. Its grade determines which configured capacity group it counts against.
- If the programme has disciplines, choose one. Adding a new placement at a site with a default discipline starts with it already chosen; editing an existing placement never changes its discipline when you change its site.
- Add module tags to track curriculum exposure for this placement.
- Add notes for context that is specific to this placement.
- If the change moves the dates, answer
What happens to the later posts?(see Move a trainee). - Save the change and review any overlap, capacity or curriculum requirement warning that appears.
Change several placements at once
Bulk Edit, above the placement list, changes a set of placements in one step.
- Open the trainee record and select
Bulk Edit. - Tick the placements to change, or use
Select AllandDeselect All. The toolbar counts how many are selected. - Choose an
Action:Change Site,Change WTE,Change Training Grade,Move by months, orDelete Selected. - Fill in the new value, and apply.
- Select
Cancel Selectto leave bulk editing.
- For
Move by months, type a number inMonths (+ later, - earlier), for example-2. It moves only the ticked placements. If that makes an overlap with one that is not ticked, the toolbar says so and offersMove anyway. - In
Groupedview,Edit all Nticks every placement in the group for you.
Check an LTFT trainee's progress
When a trainee works less than full time, placements show a WTE-scaled equivalent months badge (for example, a six-month placement at 0.5 WTE shows 3.0 equiv).
- On the new pathway view, the pathway strip and the stage headers in the placement list show the same breakdown: each stage's completed equivalent months against its expected total. On the classic view, the stage progress summary above the placement list shows it instead, with a colour-coded dot per stage.
- The pathway strip always starts showing the whole pathway; once it is over 48 months, use the
Whole pathway/3 years around todaytoggle above it to zoom in around today. - Placements that do not map to a stage appear under
Unassigned. - A total row aggregates all stages so you can see progress at a glance.
- A placement on a leave site does not count towards a stage's completed (equivalent) months, in either view. The CCT date is a field on the trainee's profile; the app does not calculate it.
Record an ARCP outcome
The trainee record also stores ARCP history and related summaries.
- Open the trainee record.
- Open the ARCP section.
- Enter the review date, outcome code, and summary.
- Optionally set the
next ARCP dateto record when the trainee's next panel is due. This feeds into the upcoming ARCPs panel on the reports page. - If the outcome is unsatisfactory, add the relevant U code.
- Save the ARCP event and review the history list.
Find out why a placement is flagged
The validation panel opens as a right-hand panel and lists every current issue. Counts of overlaps, gaps and capacity issues sit at the top. The badge in the header updates live as you make changes.
- Overlap — two placements cover the same month for one trainee.
- Gap — unplanned months appear between a trainee's scheduled placements.
- Past overlap and past gap — the same, but no current placement is in it: two finished placements overlap, or the gap is fully in the past. These grey cards show only when the check has
Also flag past placementson, and the counts at the top do not include them. - Capacity breach — planned WTE exceeds configured site capacity for a group and period.
- Training grade missing or not mapped — a placement has no training grade, or a grade that counts against no capacity group.
- Stage out of order — a post goes back to an earlier stage than the post before it.
- Curriculum requirement not met — planned months in a stage and discipline are below the minimum, or above the maximum. This rule is off until the programme sets up curriculum requirements.
- Open the validation panel using the alert button in the header.
- Read each card. It says what is wrong and lists the months and placements behind it — for example, the two placements in an overlap, or the peak WTE of a capacity breach.
- Select a card with
View Traineeto open that trainee's record. - Fix the underlying placement problem.
- Check that the card has gone from the panel.
On the new pathway view, a trainee's own gaps, overlaps, out-of-order stages and curriculum shortfalls also list in an Issues on this pathway panel in the right column.
Showjumps the placement list to the row.Fill gap, on a gap, opens the insert form with the gap's dates.Resolve, on a gap or an overlap, opens the resolution window.- Curriculum shortfalls are listed with no buttons.
- Past overlaps and past gaps always show here, after the current issues, as grey cards (
Past overlap: 2 months). They haveShowandResolve, but noFill gap. A fix moves a finished post, so the resolution window asks you to tick a box first. If your organisation admin turns offAllow Resolve on past overlaps and gaps, they haveShowonly.
- Validation rules are configurable per programme — your organisation admin can enable, disable, or adjust the severity of each rule in
Programme Setup.
See where the gaps are
Reports & Gaps turns the current plan into quick operational summaries so you can spot shortage patterns faster.
- KPI cards — active trainees, current fill rate (%), current gaps in WTE, and sites with capacity limits.
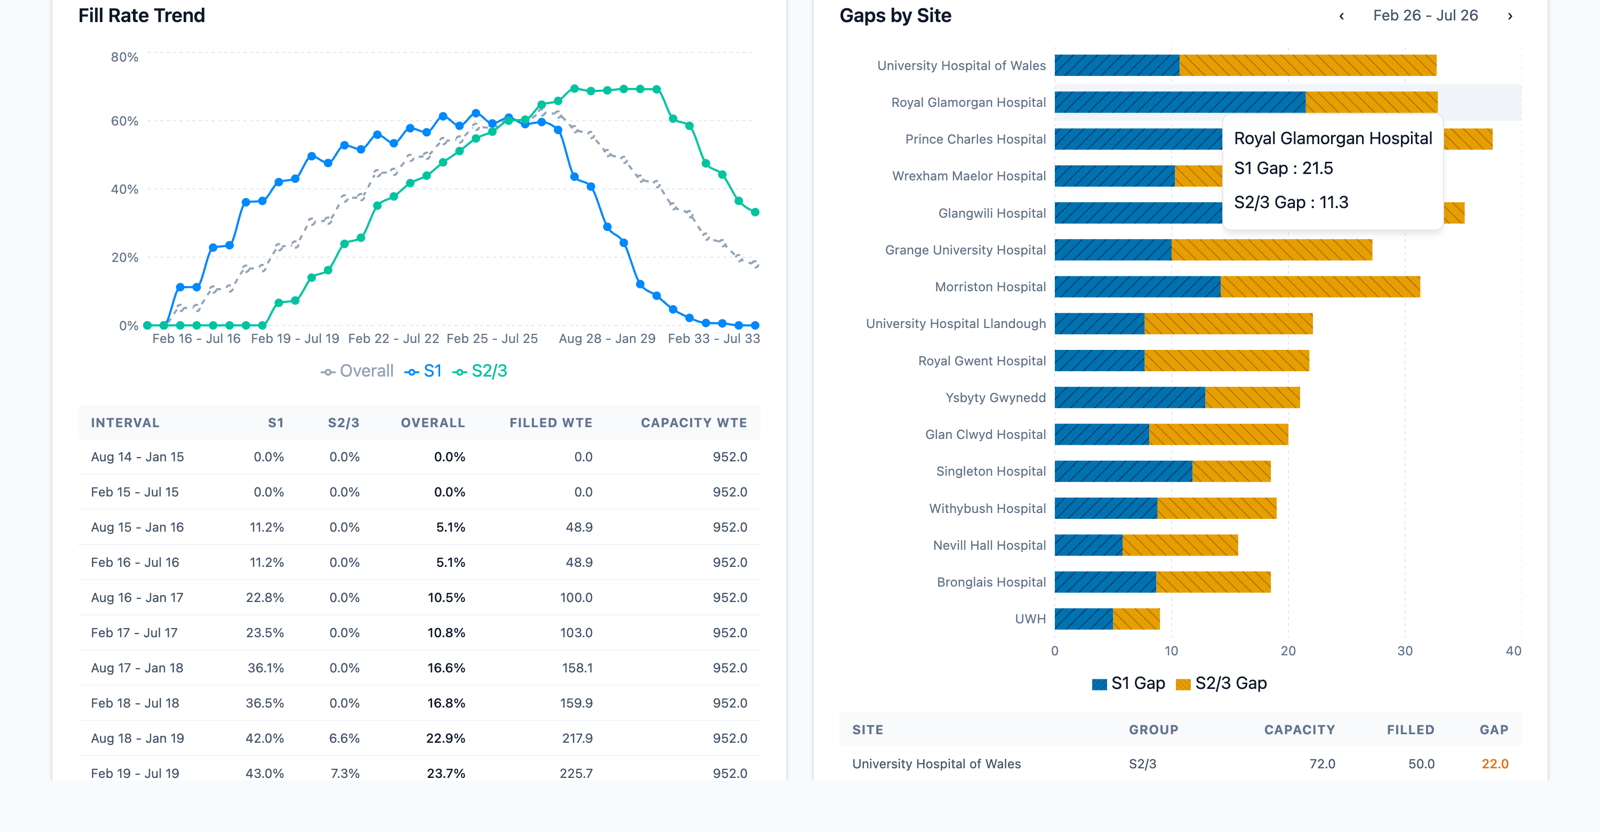
- Fill rate trend — a chart showing fill percentage over time, broken down by capacity group and overall.
- Fill rate table — sortable columns for each capacity window: group rates, overall fill %, filled WTE, capacity WTE, gap WTE.
- Gaps by site chart — stacked bar chart showing gap WTE by site and capacity group.
- Gaps by site table — sortable rows for sites that have unfilled capacity, filtered to show only sites with active gaps.
- Grade distribution — pie chart of active trainees by training grade.
- Upcoming ARCPs — a bar chart showing ARCP panels due by month and a table listing each trainee's next due date and last outcome. Appears when trainees have a next ARCP date set.
- Curriculum Progress — appears once the programme has curriculum requirements set up. One row per trainee, stage and discipline once the trainee has reached that stage, showing months planned against the minimum (and maximum, if set) and whether the requirement is met, short, or exceeded. Past and planned placements both count; only a deleted placement is left out. A stage still in progress can show short of a requirement — an unplanned month is not yet a met one. Months are counted in whole-time-equivalent (WTE) months, not calendar months: 6 months at 0.5 WTE counts as 3. Search by name, filter to one stage, or tick Shortfall only to list just the trainees who are short. The same figures show for one trainee in their trainee window: in the pathway summary, open a stage to see each discipline's months against its requirement.
Try a change without committing it
The scenario planner lets you test structural changes to the plan without touching the live data. Switch modes using the planner mode toggle in the app header.
Live(green dot) is the default. Changes here are saved immediately to the real plan.Testing(pulsing amber dot) is a sandbox. Create a scenario and make changes freely. Validation runs in testing mode so you can see the impact.View(grey dot) shows a scenario read-only, without making it active — useful for sharing a screen without risking an accidental edit.

Select the ? button next to the toggle for a reminder of what each mode does.
- Select
Testingin the planner mode toggle. - Create a new scenario or select an existing one.
- Make placement changes and review validation output.
- When you are ready, start the promote. A
Review Testing Changesdialog opens before anything is written to the live plan. - Read the change list. By default it is grouped into
Added blocks,Updated blocksandRemoved blocks, each with a count. UseGroup byto group it byTraineeor bySiteinstead. A placement that moves site shows under the old site and under the new site. With more than 10 changes, each group starts closed: select a group to open it, or useExpand all. Updated placements show the current and proposed version side by side. The summary and the promote button stay in view while you scroll. - If someone changed the live plan after you changed the same placement in the scenario, a
Posts changed in Livelist shows at the top. Each entry names the trainee, shows the live placement now and your testing version, and says what happened in Live. You cannot promote until the list is empty. For each placement, select one: -Use Livedrops your testing change to that placement, so the scenario shows the live placement again. -Keep Testingkeeps your testing version. Promoting then writes it over the change made in Live. This is not offered for a placement deleted in Live. - Confirm with
Promote N changes to Live, or cancel and keep working in the scenario. Promoting writes the changes to the live plan and records an audit entry. - To abandon the scenario instead, use the discard action. The live plan is unchanged.
In Testing mode, deleting a placement asks you to confirm first, naming the site and months. There is no Undo for it in a scenario.
- Promote is never silent. If the dialog shows changes you did not expect, cancel it — that is the point of the preview.
- Promote never overwrites a live change made after you changed the same placement in the scenario. It stops and lists the placement for you to decide.
Fix an overlap, a gap or an over-capacity site
Scheduling problems normally surface either while you are editing a trainee or while you are reviewing the validation panel.
- Overlaps happen when more than one placement covers the same trainee month.
- Gaps happen when unplanned months appear between a trainee's first and last scheduled placements.
- Capacity breaches happen when planned WTE exceeds a site's capacity for a capacity group.
To fix a trainee's gap or overlap, open their record and select Resolve on the issue in Issues on this pathway. The Resolve Timeline Conflict window shows the size of the problem, a choice of fixes, and a Timeline Preview of the current and proposed placements side by side.
Move only this postorMove only the next post— moves one placement and nothing else.Change only the next post's start— the next placement starts earlier or later and ends as before, so it gets longer or shorter.Fill the gap with Leave / OOP— for a gap only. Adds one placement that covers the gap at a Leave / Other or Out of Programme site. Choose the site in the list. The window does not choose it for you, even when there is only one, andApply Changesstays off until you choose. If the programme has no such site, add one inManage Sitesfirst.Shift Future Blocks— moves every later placement by the same amount.Shift Earlier Blocks— moves this placement and every one before it.Adjust Duration— makes this placement longer or shorter to meet the next.
The window lists the best fix first and marks it Recommended. Under each fix, a line tells you how many issues it clears, how many new issues it makes, how many placements it changes, and how much training time it removes. A fix that makes no new issue comes first. Next comes a fix that keeps every site within capacity. A fix that goes over a site's capacity still shows, with Capacity Warnings, but it comes lower in the list. Only a breach that the fix makes, or makes worse, counts. If a site is already over capacity before the fix, and the fix does not add to it, the fix gets no warning. For a past gap or overlap, a new past gap or overlap also counts as a new issue. A fix that removes training time comes after every fix that does not.
Under the preview, the window says either that the fix makes no new gap or overlap, or lists what to Check the result for. Select Apply Changes to save.
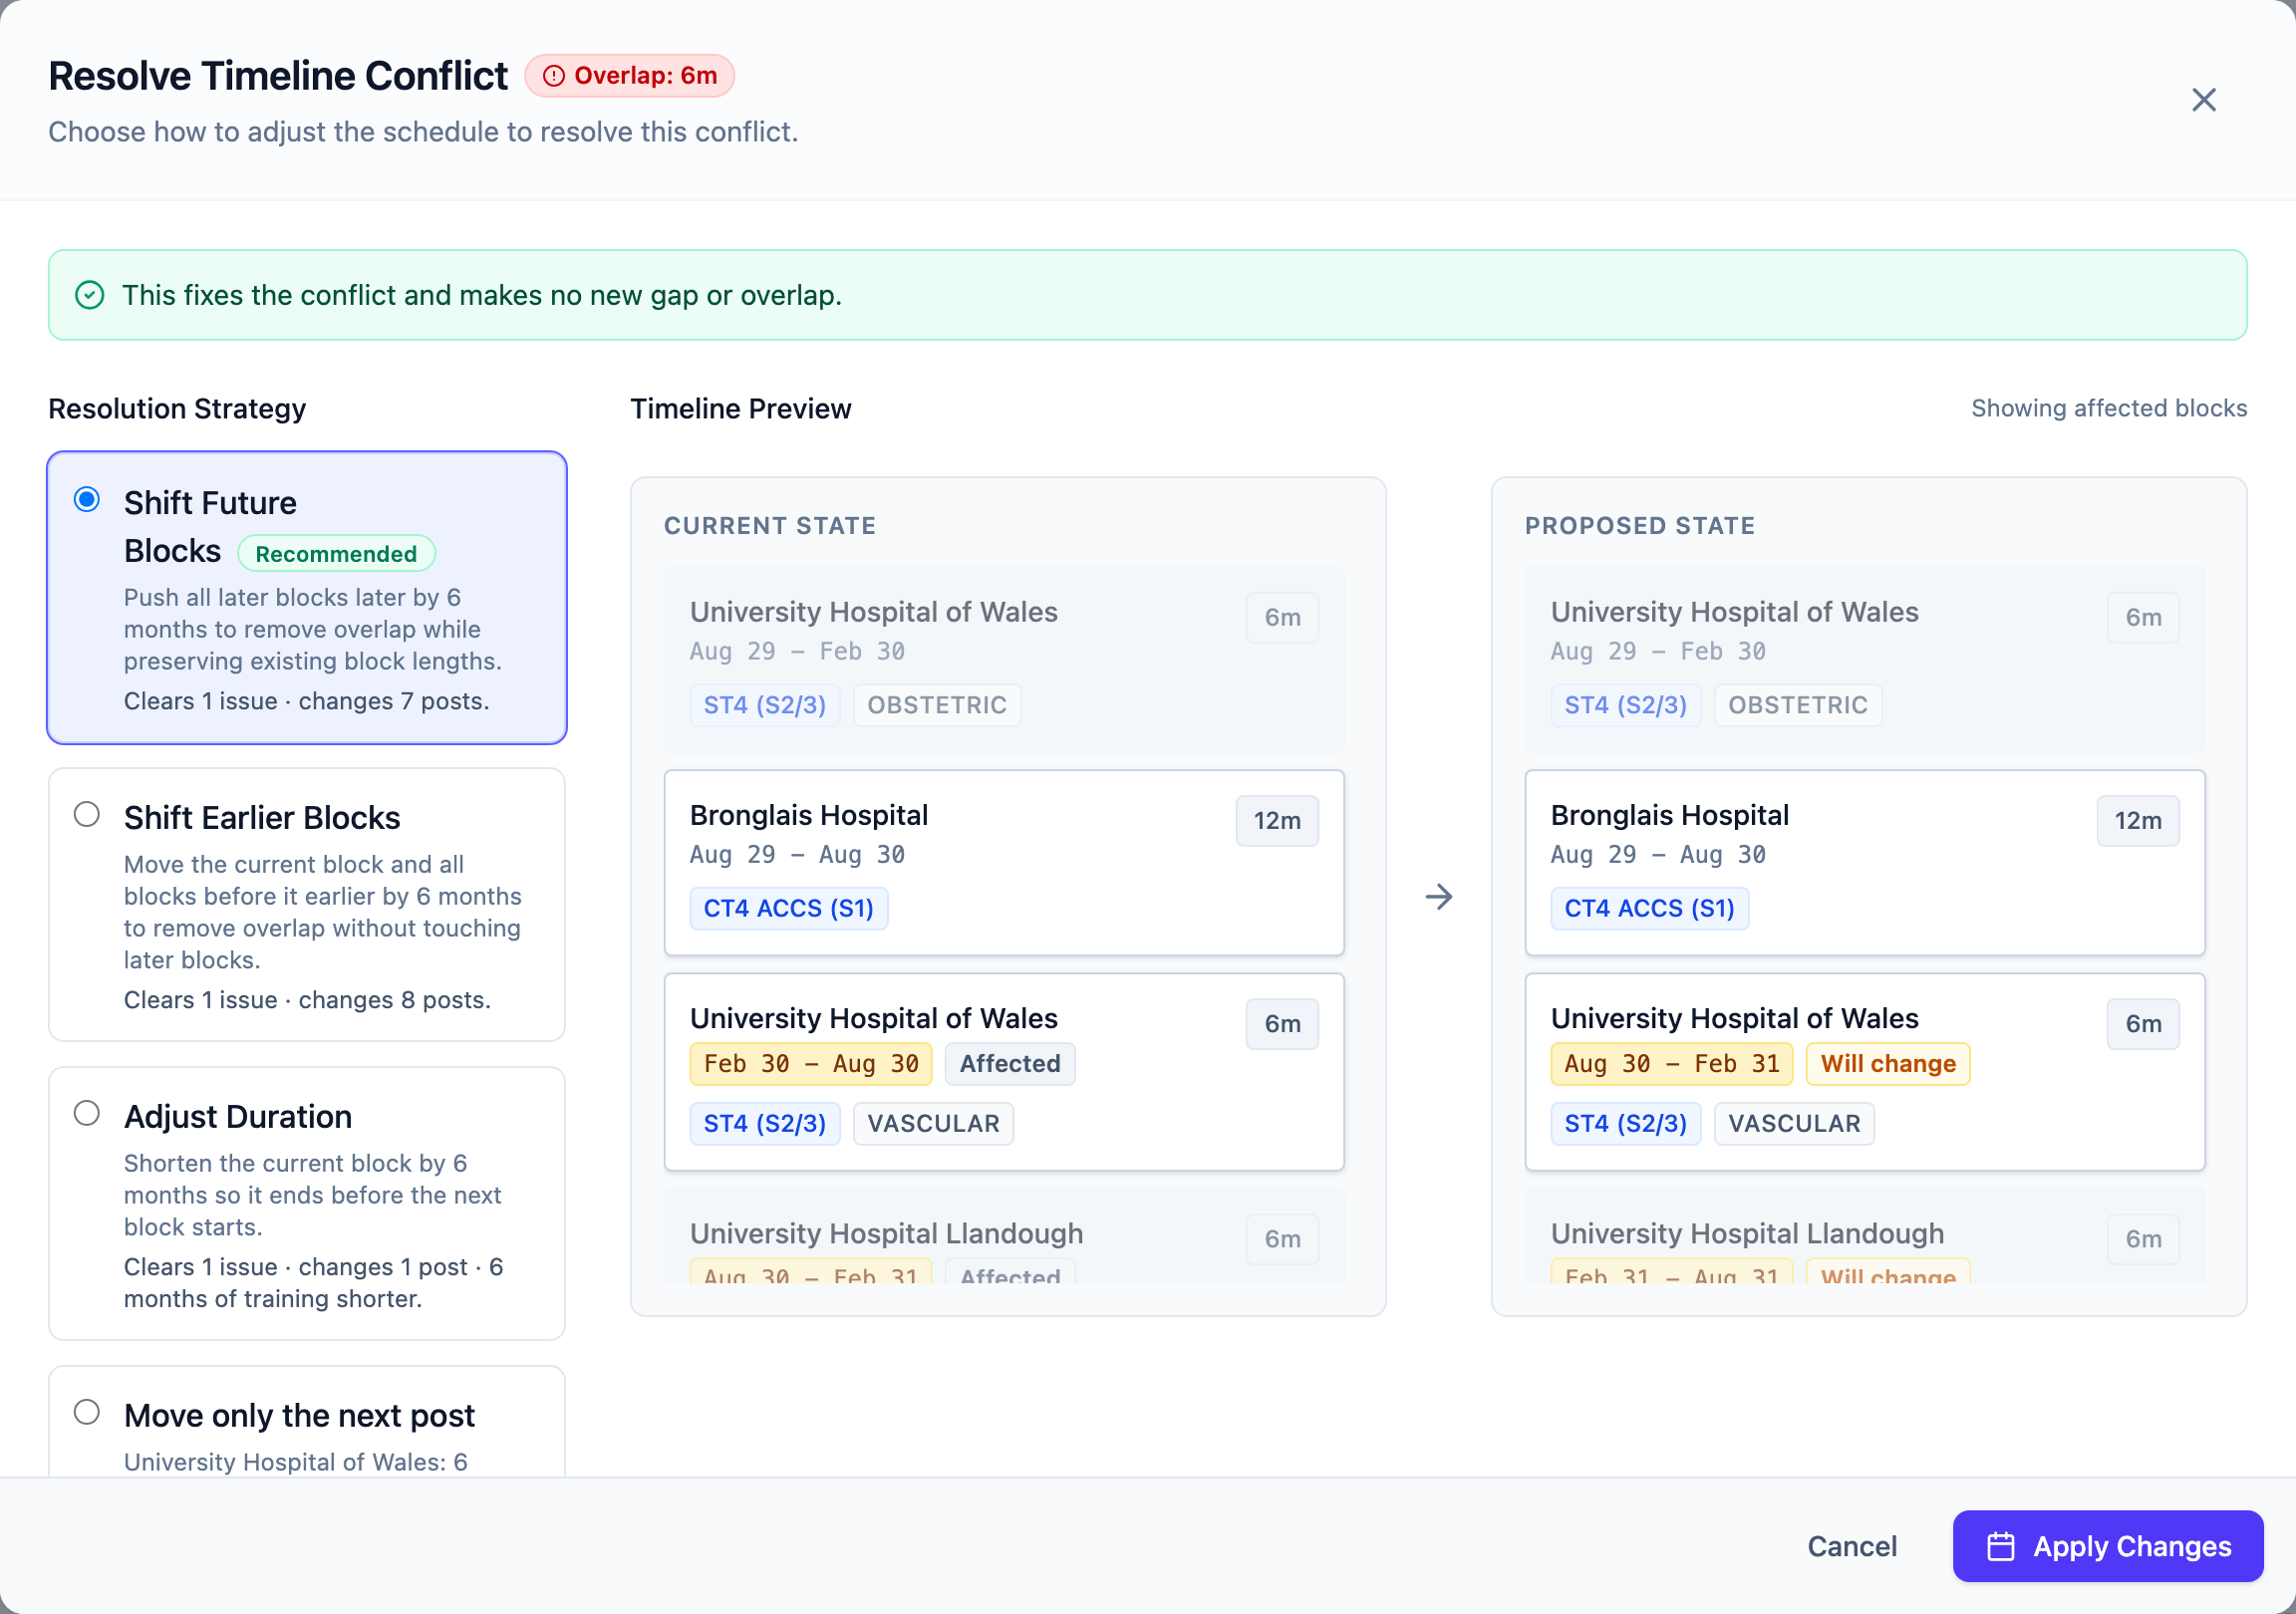
Resolve Timeline Conflict window. Each fix says what it clears and what it changes, and the preview shows the result before you apply it.- Past placements are locked. If a fix would change one, the window says how many, and you must tick the box to allow it.
- A capacity breach is a site problem, not a trainee one. Move a placement to another site, or change the site's capacity in
Manage Sites.
Find out who changed something, and undo it
Important changes create audit records, and some trainee-level actions can be undone or redone from the trainee record.
- Use audit history to understand what changed and who changed it.
- On the new pathway view, the right column has three sections — admin notes,
Issues on this pathwayand the audit history. Select a section's header to open or close it. Admin notes start closed, with a dot and the first line when there are notes. The audit history opens by itself only when someone edited the trainee in the last 7 days. Closed, it shows the date of the last change, for example "No edits in the last 7 days. Last change: 3 Aug 2026." - Use undo or redo only after checking whether related records changed.
- Use
Recycle Binfor restore workflows after soft deletion.
Get the plan out as a spreadsheet
The Reports & Gaps tab includes an Export Data (XLSX) action that generates a workbook for the selected programme.
- Confirm the correct programme is selected.
- Open
Reports & Gaps. - Select
Export Data (XLSX). - Wait for the workbook download to complete.
- Review the file outside the app.
- The workbook includes five sheets:
Capacity Grid,Trainees,Blocks,Sites, andARCP History. - Capacity Grid totals count every placement at the site, and match the site totals in the interactive grid. Blank or unmapped grades appear in the
Blockssheet'sUnallocated WTEcolumn so you can identify missing mappings. - To print a report, open
Reports & Gapsand usePrint Report (PDF). This opens a print-optimised view of the current report.
Add a site or change its capacity
Manage Sites is where you configure the hospitals, leave types, and other placement locations available in the plan.
Manage Sitesrequires the programme to be initialized inProgramme Setupfirst.- Sites are grouped by region. You can rename regions and move sites between them.
- Each site has a capacity configuration per capacity group with optional date-range overrides.
- Leave and out-of-programme site types can be set to unlimited capacity.
Catch up on what changed while you were away
The sidebar has a Recent Activity section at the bottom showing the last three changes in the programme — the action, who made it, and how long ago.
View allopens the full activity panel on all recent activity.What's newopens the same panel filtered to changes since your last sign-in. It appears once you have signed in before.- The panel offers
Undoon entries that can be reversed. - If programme selection is still loading, the panel waits and prompts you to select a programme instead of showing an audit-log error.
- The activity panel opens by itself once per session, the first time you load the app, if you have signed in before. Closing it stops it reappearing for the rest of that session.
- For product changes rather than data changes, use
What's newin the header?menu — that lists what has changed in RotationGrid itself, newest first, and marks the entries you have not read.
Give a trainee their own schedule
The three buttons at the top right of the trainee record send a trainee their placements.
Download schedule (.xlsx)saves the trainee's schedule as a spreadsheet.Email schedule to …sends that spreadsheet to the email address on the trainee's profile. The button is off until the profile has an email address. The email names you as the sender, so the trainee can reply to you.Download calendar (.ics)saves a calendar file, which the trainee can import into Outlook or any calendar app.
Reports & Gapshas a calendar control for the whole programme —Download calendar (.ics)there exports every placement in the programme, for subscription or import.
Key rules and limits
TPDs have strong programme-level control, but a few limits matter in everyday use.
- Your access is limited to assigned programmes unless you also hold a broader role.
- You can maintain the local programme setup for assigned programmes, but you cannot edit the shared
Blueprintslibrary. - Deletion is soft delete, not permanent removal.
- Save conflicts happen if another user changed the same record first.
- Reports reflect the selected programme and its current setup.
Next steps
Use troubleshooting when data or access looks wrong, and use the roles page when you need to explain scope differences to other users.